Elecrow · ESP32-P4 · 5.0" · 800×480
Elecrow CrowPanel Advanced 5" ESP32-P4 HMI specifications
This page collects the pinout, free GPIOs and hardware details of the CrowPanel Advanced 5" ESP32-P4. The board isn't in the LCD Ultra Pro™ editor yet, so there's no driver for it there.
The smallest ESP32-P4 CrowPanel breaks the family pattern. Its 7, 9 and 10.1-inch siblings drive their panels over MIPI-DSI, but the 5-inch model uses a 16-bit RGB bus, the same kind of interface you'd find on an ESP32-S3 board. Code written for the bigger P4 panels won't bring this screen up without changes.
You still get the P4 platform: a dual-core RISC-V ESP32-P4 at up to 400 MHz, 32 MB of PSRAM and 16 MB of flash. The P4 has no radio of its own, so an ESP32-C6-MINI-1 sits next to it and provides Wi-Fi 6 and Bluetooth 5 over SDIO (GPIO 49 to 54).
Audio is a strong point on this size. The I2S output feeds two separate speaker amplifiers, and a PDM microphone sits on GPIO 24 (clock) and 25 (data). The backlight is set through an STC8H1K08 at I2C address 0x2F, not a GPIO. Seven GPIOs come out on a 2×8 header, though most of them are shared with the radio-module socket.
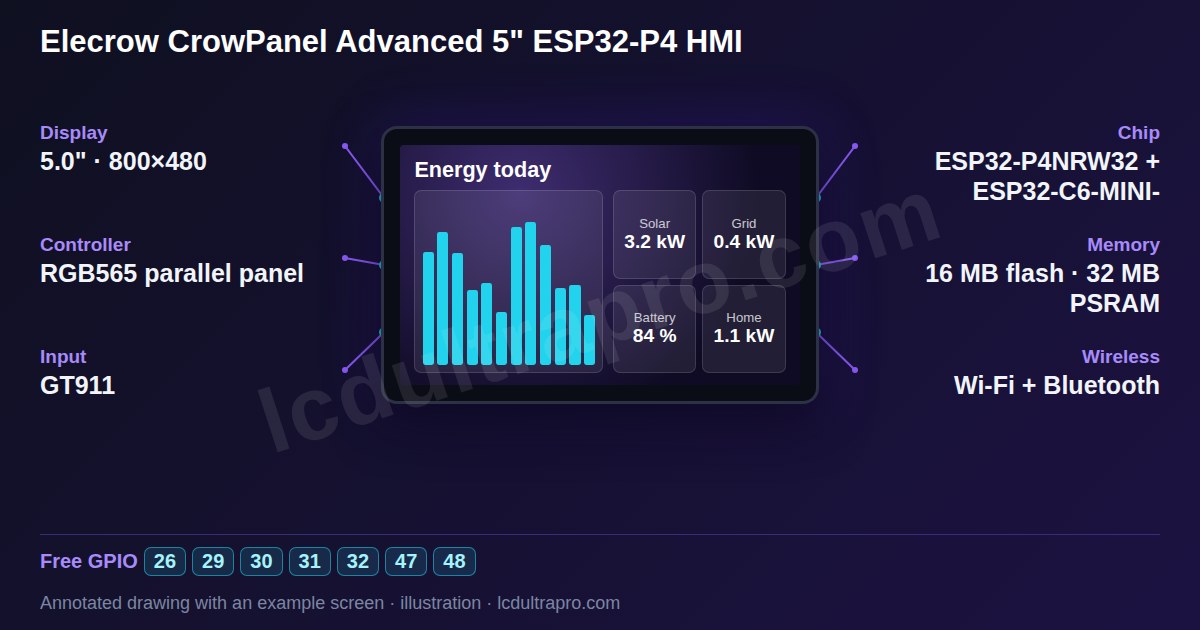
- Screen
- 5.0" · 800×480
- Chip
- ESP32-P4
- Memory
- 16 MB flash, 32 MB PSRAM (OPI/HPI)
- Input
- capacitive touch
Key features
- 5-inch IPS, 800×480, 16-bit RGB
- GT911 capacitive touch, up to 5 points
- ESP32-P4 with 32 MB PSRAM and 16 MB flash
- ESP32-C6 co-processor: Wi-Fi 6, Bluetooth 5
- Two speaker amplifiers and a microphone
- Camera header, microSD, GPIO header
Specifications
| Manufacturer | Elecrow |
|---|---|
| Screen size | 5.0" |
| Resolution | 800×480 px |
| Colour depth | 16-bit |
| Display controller | RGB565 parallel panel |
| Display interface | RGB565 parallel |
| Touch | GT911 (capacitive, I2C, address 0x5D or 0x14) |
| Microcontroller | ESP32-P4 |
| Module | ESP32-P4NRW32 + ESP32-C6-MINI-1 (Wi-Fi 6 / Bluetooth 5 co-processor over SDIO) |
| CPU clock | 400 MHz |
| Internal SRAM | 768 KB |
| PSRAM | 32 MB (OPI/HPI) |
| Flash | 16 MB |
| Wi-Fi | Yes |
| Bluetooth | Yes |
| Hardware variant | Pin map per the Elecrow wiki. Unlike the 7/9/10.1-inch models this one drives an RGB parallel panel, not MIPI-DSI. The backlight is set through an STC8H1K08 I/O controller (I2C 0x2F, its pin P3.7); touch reset is wired to GPIO 36 and to STC8 pin P1.2. A DIP switch selects whether GPIO 47/48 serve the UART1 port or the wireless-module SPI. Audio: I2S speaker output (4 ohm 3 W) and a PDM microphone. With the screen on the board draws 8-10 W, so a PC USB port alone may not be enough. |
| Display | 5-inch IPS, 800×480, RGB565 (PCLK 3, DE 2, HSYNC 40, VSYNC 41), 400 cd/m² typ. |
| Touch | GT911 (0x5D or 0x14) on I2C GPIO 45/46, INT 42, RST 36 |
| Wireless | ESP32-C6-MINI-1 over SDIO, enable on GPIO 20 |
| Backlight | STC8H1K08 I/O controller at I2C 0x2F |
| Ports | UART1 and I2C (HY2.0-4P), UART3-IN (XH2.54-4P), 2×8 GPIO header, two speaker outputs, battery |
| Size | 180 × 105 mm, active area 155 × 87 mm |
Board layout and connectors
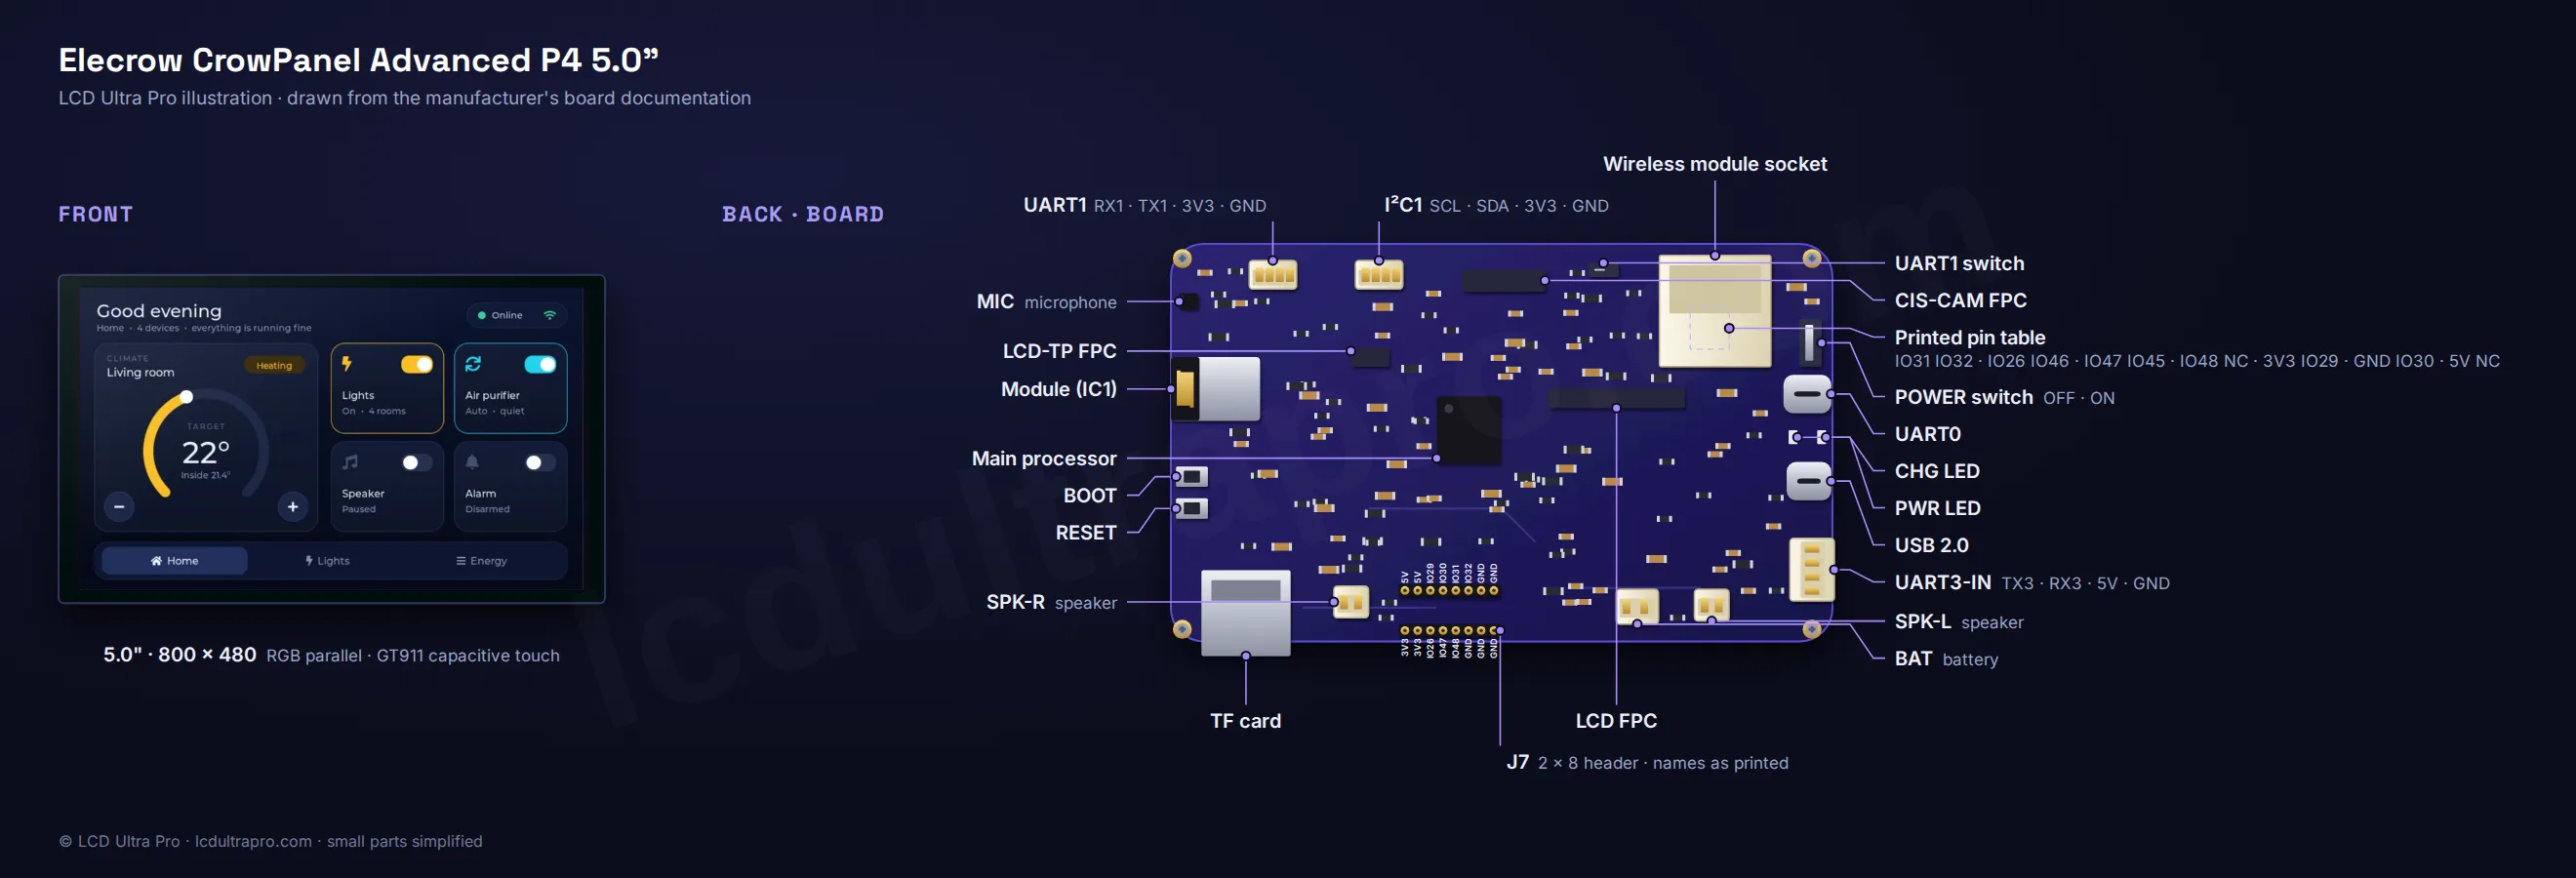
Where each connector, button and LED sits on the Elecrow CrowPanel Advanced 5-inch ESP32-P4 HMI, with the pin order next to each header where the manufacturer confirms it. We drew it from the manufacturer’s own photos and board documentation. The tiny parts are simplified.
GPIO pinout
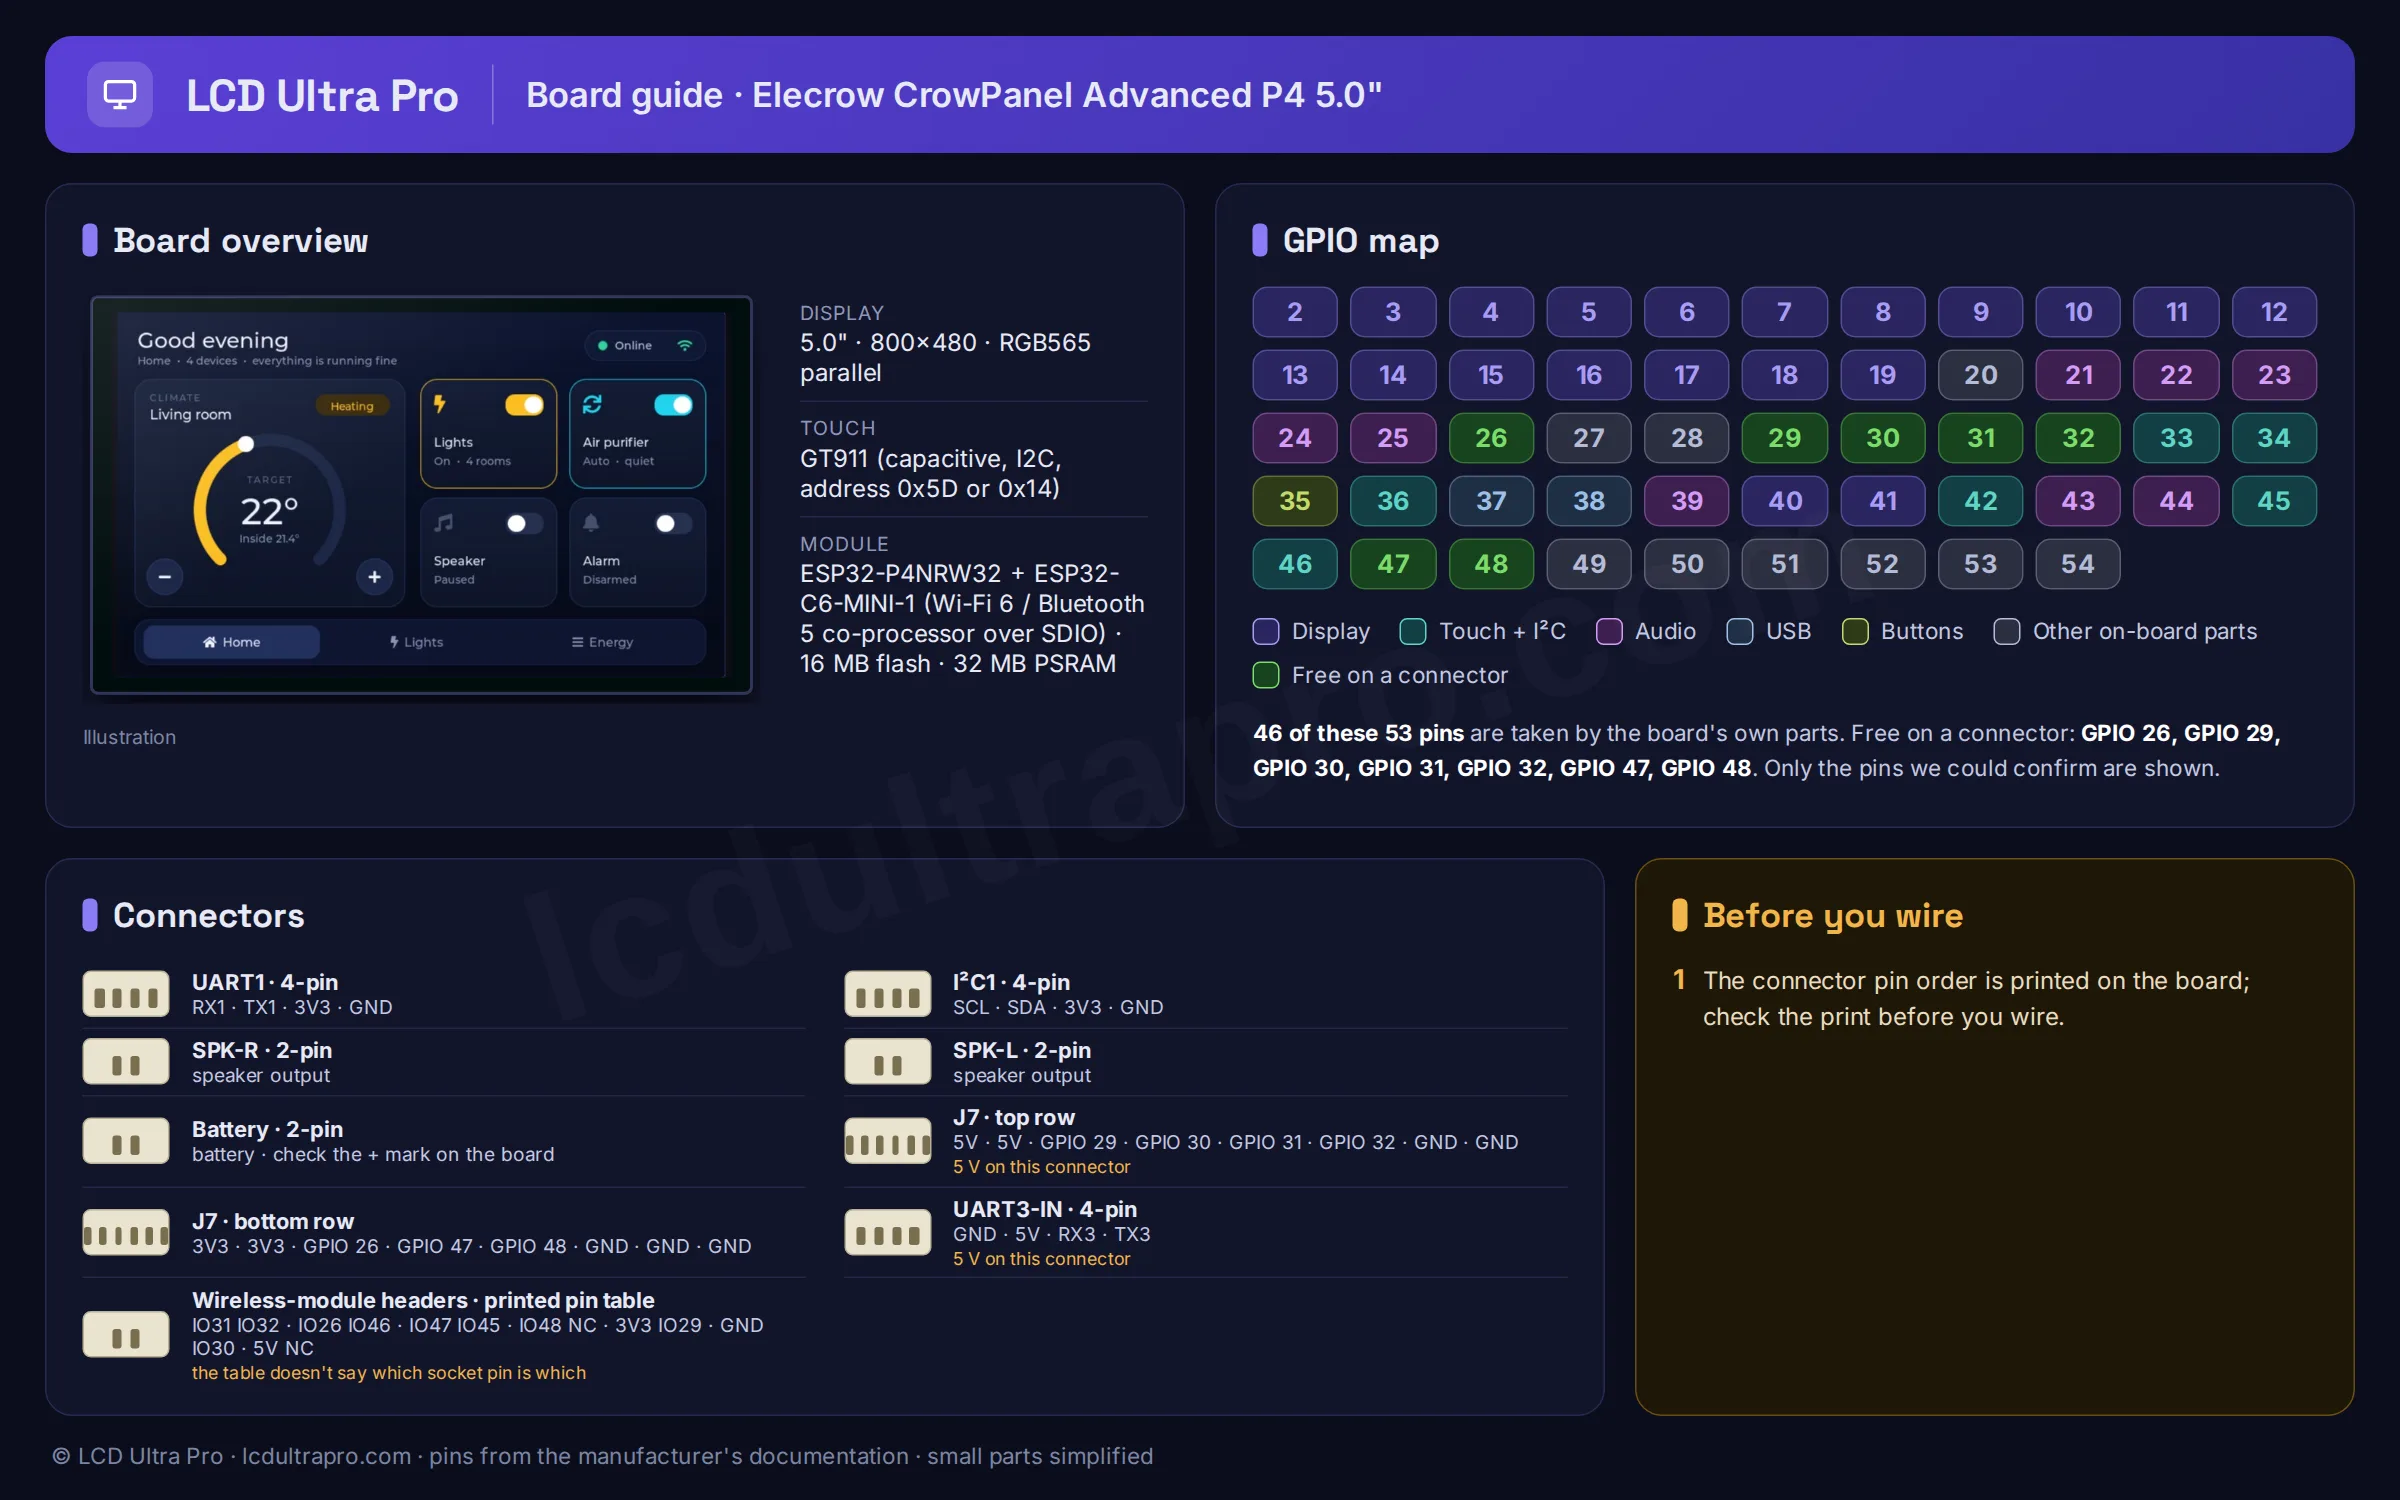
The GPIOs the board itself uses for the display, touch and on-board peripherals, as published in the manufacturer’s documentation. Pins whose function isn’t stated clearly are left out.
| GPIO | Function |
|---|---|
| GPIO 2 | LCD DE |
| GPIO 3 | LCD PCLK |
| GPIO 4 | LCD B7 |
| GPIO 5 | LCD B6 |
| GPIO 6 | LCD B5 |
| GPIO 7 | LCD B4 |
| GPIO 8 | LCD B3 |
| GPIO 9 | LCD G7 |
| GPIO 10 | LCD G6 |
| GPIO 11 | LCD G5 |
| GPIO 12 | LCD G4 |
| GPIO 13 | LCD G3 |
| GPIO 14 | LCD G2 |
| GPIO 15 | LCD R7 |
| GPIO 16 | LCD R6 |
| GPIO 17 | LCD R5 |
| GPIO 18 | LCD R4 |
| GPIO 19 | LCD R3 |
| GPIO 20 | ESP32-C6 enable / reset |
| GPIO 21 | I2S LRCK (two speaker amplifiers) |
| GPIO 22 | I2S SCLK (two speaker amplifiers) |
| GPIO 23 | I2S data out (two speaker amplifiers) |
| GPIO 24 | PDM microphone clock |
| GPIO 25 | PDM microphone data |
| GPIO 26 | Wireless module SPI SCK (also GPIO header) |
| GPIO 27 | UART3 TX (UART3-IN terminal) |
| GPIO 28 | UART3 RX (UART3-IN terminal) |
| GPIO 29 | Wireless module: SX1262 BUSY / nRF24 IRQ (also GPIO header) |
| GPIO 30 | Wireless module: SX1262 NSS (also GPIO header) |
| GPIO 31 | Wireless module: SX1262 IRQ / nRF24 CE (also GPIO header) |
| GPIO 32 | Wireless module: SX1262 reset / nRF24 CSN (also GPIO header) |
| GPIO 33 | Camera I2C SDA |
| GPIO 34 | Camera I2C SCL |
| GPIO 35 | BOOT button |
| GPIO 36 | Touch reset |
| GPIO 37 | UART0 TX (USB serial) |
| GPIO 38 | UART0 RX (USB serial) |
| GPIO 39 | microSD D0 |
| GPIO 40 | LCD HSYNC |
| GPIO 41 | LCD VSYNC |
| GPIO 42 | Touch interrupt |
| GPIO 43 | microSD CLK |
| GPIO 44 | microSD CMD |
| GPIO 45 | I2C SDA (touch, I/O controller, I2C port) |
| GPIO 46 | I2C SCL (touch, I/O controller, I2C port) |
| GPIO 47 | UART1 TX or wireless-module SPI MISO, set by DIP switch (also GPIO header) |
| GPIO 48 | UART1 RX or wireless-module SPI MOSI, set by DIP switch (also GPIO header) |
| GPIO 49 | ESP32-C6 SDIO D3 |
| GPIO 50 | ESP32-C6 SDIO D2 |
| GPIO 51 | ESP32-C6 SDIO D1 |
| GPIO 52 | ESP32-C6 SDIO D0 |
| GPIO 53 | ESP32-C6 SDIO CLK |
| GPIO 54 | ESP32-C6 SDIO CMD |
Source: github.com, www.elecrow.com, www.elecrow.com, www.elecrow.com. Always check against your board revision before wiring.
Free GPIOs and connectors
These GPIOs are not used by the display, touch or on-board peripherals, so you can wire your own sensors, buttons or relays to them.
| Pin | Capabilities | Note |
|---|---|---|
| GPIO 26 | GPIO, PWM | On the GPIO header; shared with the wireless module header |
| GPIO 29 | GPIO, PWM | On the GPIO header; shared with the wireless module header |
| GPIO 30 | GPIO, PWM | On the GPIO header; shared with the wireless module header |
| GPIO 31 | GPIO, PWM | On the GPIO header; shared with the wireless module header |
| GPIO 32 | GPIO, PWM | On the GPIO header; shared with the wireless module header |
| GPIO 47 | GPIO, PWM | UART1 TX on the UART1 port and the GPIO header; the DIP switch can hand it to the wireless module instead |
| GPIO 48 | GPIO, PWM | UART1 RX on the UART1 port and the GPIO header; the DIP switch can hand it to the wireless module instead |
- GPIO header — GPIO 26, 29, 30, 31, 32, 47, 48 · 2 x 8-pin female
Shares its pins with the wireless module header and the UART1 port
- UART1 port — GPIO 48, 47 (RX, TX) · HY2.0-4P
Shares GPIO 47/48 with the wireless-module SPI; a DIP switch selects which one is connected. 3.3 V output, 1 A max
- I2C port — GPIO 46, 45 (SCL, SDA) · HY2.0-4P
Level-shifted; same bus as the GT911 touch and the STC8H I/O controller (0x2F)
- UART3-IN terminal — GPIO 27, 28 (TX, RX) · XH2.54-4P
Level-shifted, also a 5 V (+/-5 %, 2 A max) power input
- Wireless module header — GPIO 26, 29, 30, 31, 32, 45, 46, 47, 48 · 2 x 7-pin female
SPI SCK 26, MISO 47, MOSI 48 (enabled by the DIP switch), SX1262 BUSY 29, NSS 30, IRQ 31, reset 32. 3.3 V, 1 A max
Good to know before you start
- Not supported in the LCD Ultra Pro editor yet, so treat this page as a datasheet.
- RGB, not MIPI-DSI. Examples for the 7-inch and larger P4 panels need a different display driver, and a different LVGL: this board's lessons use 9.1, theirs 8.3.
- Wi-Fi goes through the ESP32-C6, which runs its own firmware next to your P4 application.
- The free header pins double as radio-module pins: SX1262 BUSY 29, NSS 30, IRQ 31, reset 32. With a module plugged in, they are taken.
- GPIO 47/48 serve either the UART1 port or the radio module's SPI. A DIP switch picks one, so check it when UART1 stays silent.
- With the screen on it pulls 8 to 10 W. A single PC USB port often can't keep up and the screen goes dark, so plug in the second USB port too, or use the UART3-IN terminal.
- The camera is optional. The wiki names this version "Without Camera", so the 2 MP MIPI-CSI module has to be bought separately.
What it is good for
- •Voice assistant front-ends with stereo output
- •Compact smart-home panels that need Wi-Fi 6
- •Camera projects with a local preview screen
LVGL support in LCD Ultra Pro™
This board is documented in the wiki, but it is not in the LCD Ultra Pro™ editor yet, so you can’t pick it there or export a project for it. The specs, pins and connectors on this page come from the manufacturer’s own material and are there to help you wire and configure it. See the board list for boards the editor supports today.
Arduino IDE settings
From the manufacturer's documentation (not tested by us yet)
| Board | ESP32P4 Dev Module |
|---|---|
| Flash Frequency | 80MHz |
| Flash Mode | QIO |
| Flash Size | 16MB (128Mb) |
| Partition Scheme | 16M Flash (3MB APP/9.9MB FATFS) |
| PSRAM | Enabled |
| Upload Mode | UART0 / Hardware CDC |
| USB Mode | Hardware CDC and JTAG |
Board package: esp32 by Espressif Systems
Menu items the manufacturer doesn't mention are left at their defaults. We haven't compiled a driver for this board ourselves yet. Manufacturer's source
Frequently asked questions
Does the 5-inch CrowPanel Advanced use MIPI-DSI?
No. Its panel is driven over a 16-bit RGB bus from the ESP32-P4. Only the 7, 9 and 10.1-inch models use MIPI-DSI.
How does an ESP32-P4 board get Wi-Fi?
Through an ESP32-C6-MINI-1 module connected over SDIO. The C6 handles Wi-Fi 6 and Bluetooth 5, the P4 runs your application.
How is the backlight controlled?
An STC8H1K08 microcontroller at I2C address 0x2F sets it. Elecrow's ESP-IDF examples include a small driver for it.
Which LVGL version do the examples use?
LVGL 9.1, in both the Arduino and the ESP-IDF lessons. The Arduino sketches bundle it together with the ESP32_Display_Panel library.
Sources
Specifications cross-checked against the manufacturer’s documentation (last checked 2026-11-04):
- https://github.com/Elecrow-RD/-CrowPanel-Advanced-5inch-ESP32-P4-HMI-AI-Display-800x480-IPS-Touch-Screen
- https://www.elecrow.com/crowpanel-advanced-5inch-esp32-p4-hmi-ai-display-800x480-ips-touch-screen-with-wifi-6.html
- https://www.elecrow.com/wiki/CrowPanel_Advanced_5inch_ESP32-P4_HMI_AI_Display_800x480_IPS_Touch_Screen_with_WiFi_6.html
- https://www.elecrow.com/wiki/5inch_P4_Arduino_01_Print_Hello_World.html
More in the Elecrow CrowPanel family
- Elecrow CrowPanel 1.28" ESP32-S3 Round Rotary Display
- Elecrow CrowPanel ESP32-C3 1.28" Round Display
- Elecrow CrowPanel 1.46" ESP32-S3 Round Rotary Display
- Elecrow CrowPanel 2.01" ESP32-S3 Watch Display
- Elecrow CrowPanel 2.1" ESP32-S3 Round Rotary Display
- Elecrow CrowPanel Advance 2.4" ESP32-S3 HMI
- Elecrow CrowPanel ESP32 HMI 2.4"
- Elecrow CrowPanel Advance 2.8" ESP32-S3 HMI
- Elecrow CrowPanel ESP32 HMI 2.8"
- Elecrow CrowPanel Advance 3.5" ESP32-S3 HMI
- Elecrow CrowPanel ESP32 HMI 3.5"
- Elecrow ESP Terminal 3.5" 16-bit Parallel
- Elecrow ESP Terminal 3.5" SPI with Camera
- Elecrow CrowPanel Advance 4.3" ESP32-S3 HMI
- Elecrow CrowPanel ESP32-S3 HMI 4.3"
- Elecrow CrowPanel Advance 5.0" ESP32-S3 HMI
- Elecrow CrowPanel ESP32-S3 HMI 5.0"
- Elecrow CrowPanel Advance 7.0" ESP32-S3 HMI
- Elecrow CrowPanel Advanced 7" ESP32-P4 HMI
- Elecrow CrowPanel ESP32-S3 HMI 7.0"
- Elecrow CrowPanel Advanced 9" ESP32-P4 HMI
- Elecrow CrowPanel Advanced 10.1" ESP32-P4 HMI
Tools for this board
Connect sensors and parts
- 28BYJ-48 stepper
- A4988 stepper driver
- ACS712 current sensor
- ADS1115 ADC
- ADXL345 accelerometer
- AHT20
- AS5600 magnetic encoder
- BH1750
- BME280
- BME680
- BMP280
- BTS7960 motor driver
- CAN bus (SN65HVD230)
- Capacitive soil moisture
- DFPlayer Mini
- DHT22 / AM2302
- DS18B20
- DS3231 RTC
- EC11 rotary encoder
- ENS160
- HC-SR04
- HC-SR501 PIR
- HX711 load cell
- INA219
- INA226
- INMP441 microphone
- IRLZ44N MOSFET
- KY-023 joystick
- 4x4 matrix keypad
- LD2410 radar
- LDR photoresistor
- MAX31855 thermocouple
- MAX7219 LED matrix
- MAX98357A I2S amp
- MCP23017 GPIO expander
- microSD card
- MLX90614 IR thermometer
- MPU6050
- MQ-2 gas sensor
- NEO-6M GPS
- NTC thermistor 10k
- PCA9685 PWM driver
- Piezo buzzer
- Push button
- PZEM-004T
- RC522 RFID
- 5 V relay module
- RS-485 (MAX3485)
- SCD40
- SG90 servo
- SHT31 / SHT3x
- SIM800L GSM
- SSD1306 OLED
- SSR-40DA relay
- LoRa SX1276
- TB6612FNG motor driver
- TCS34725 colour sensor
- TP4056 battery charger
- TTP223 touch button
- VL53L0X
- WS2812B LED strip
- YF-S201 flow sensor
Last updated:
Adding I2C sensors to this board?See which addresses its own chips already use, and what would clash.Open the checkerSomething wrong on this page?
Tell me what you found. I check every report and fix the page.